
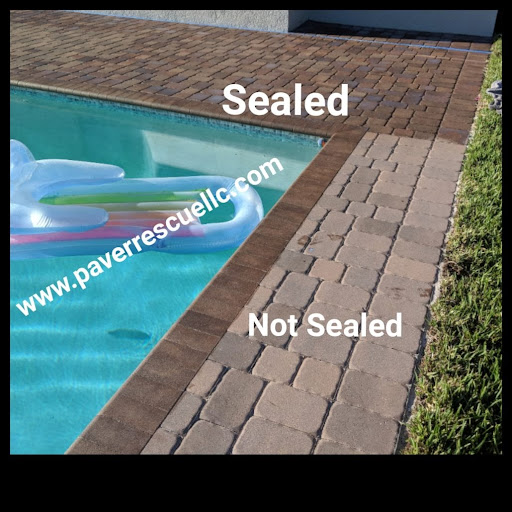
By the end of August the driveway looks tired. There’s a green-gray cast in the low spots that never quite dries, the joints between the pavers sit a half inch below the paver face, and the whole surface smells faintly like a damp towel after a morning rain. Step on the edge course near the garage apron and one paver rocks under your heel. That’s four months of afternoon storms doing exactly what they do here.
September is when that stops. The rain pattern breaks up, the overnight dew point drops, and slabs finally get long enough dry stretches to accept sealer. What follows are the things causing what you’re seeing, ordered from the ones you can check yourself in ten minutes to the ones that need somebody with a plate compactor and a moisture meter.
1. The joints are empty, and that’s free to check
Take a screwdriver and push it into a joint. If it drops more than a quarter inch below the top of the paver before hitting sand, the joints have washed out. Tampa Bay gets roughly 30 of its 50 annual inches of rain between June and September, and that runoff carries joint sand straight to the street.
Empty joints are the root cause of most of the other symptoms on this list. Sand is what transfers load from one paver to the next. Without it, each paver works alone, and the ones at the edges start to move. Weeds and ants take the vacancy immediately.
The fix is resanding. Sweep dry sand across the surface, work it in with a stiff broom, and compact it so it settles into the full joint depth. Then top it off again, because it will drop. Polymeric sand is worth using on driveways and any sloped run because it binds when wetted and resists washout better than plain silica. It costs about $25 to $40 a bag and covers 30 to 50 square feet at a typical 3/8-inch joint. Skipping this step is the most common shortcut in this trade, and sealing over hollow joints just glues the problem in place.
2. The green film is algae, not stained concrete
Look at where the discoloration lives. If it’s concentrated on the north side of the house, under the oak, or in the shaded strip along a pool cage, it’s biological growth, not permanent staining. Rub it with a wet thumb. Algae smears. A stain doesn’t.
A garden hose and a deck brush with a diluted cleaner will knock down light growth. That’s genuinely worth trying first. Heavier mildew that has soaked into the paver pores needs a surface cleaner and a proper cleaning solution, which is different from blasting it with a pressure washer wand.
Here’s the opinion: pressure washing alone is not maintenance. A narrow tip at close range chews the cement cream off the paver face and leaves the surface more porous than it was, so it grows algae back faster next summer. Cleaning is step one of four, not the whole job. Done right, professional paver cleaning and pressure washing uses a flat surface cleaner at controlled pressure so the wash is even and the paver face survives it.
3. The white haze is efflorescence, and timing matters
Chalky white bloom on a paver face is efflorescence. Mineral salts inside the concrete migrate to the surface with moisture and leave calcium carbonate behind when the water evaporates. It looks worst after a wet stretch, which is why September is when homeowners notice it.
Two versions matter. On pavers installed within the last year, it’s normal curing and it needs to finish releasing. Wait 60 to 90 days after a new install before sealing, and on some driveways longer. On older pavers, recurring haze usually means water is moving up through the base, often from a downspout dumping at the edge or a low spot that ponds.
Efflorescence comes off with an acidic efflorescence cleaner, not with a hose. Do not seal over it. Sealer locks the bloom under the film and turns a cosmetic issue into a permanent one. If you’ve already got a sealed surface with white haze under the coating, that’s a strip-and-redo, not a touch-up.
4. The color looks flat because the last sealer has worn off
Splash a cup of water on the pavers. If it soaks in and darkens the surface within a few seconds, the sealer is gone. If it beads, you still have protection. That test takes thirty seconds and tells you whether you’re due.
Recoat intervals here run 3 to 5 years for shaded patios and lanais, closer to 2 to 3 years on a west-facing driveway that takes full Florida UV plus tire traffic. Salt air on the Pinellas side shortens it further. Sun bleaching shows up first as a washed-out, chalky red on clay-toned pavers.
Two sealer families are worth knowing. Film-forming sealers sit on top, deepen color, and give you the wet-look or semi-gloss finish most people picture. Penetrating sealers soak in, repel water, and leave the surface looking natural and matte. Film-forming products also stabilize the joint sand, which is why they dominate on driveways. Water-based film formers are the right call in this climate, because a solvent-heavy product over a slab that is even slightly damp is how you get white blush and peeling. Expect to pay roughly $0.90 to $2.00 per square foot for cleaning and sealing, depending on condition, sand replacement, and how many coats the surface drinks.
5. One coat was applied last time, and it went blotchy
Patchy sheen, shiny in some spots and dull in others, usually means thin coverage rather than bad product. Pavers are thirsty. The first coat mostly disappears into the stone, and what looks like full coverage while it’s wet cures to something uneven.
Two coats minimum is the standard, applied wet-on-wet or within the product’s recoat window. Deeply worn pavers sometimes take three. You can see the difference at the joint lines: a properly sealed joint has a slightly firm, locked feel when you drag a fingertip across it, because the sealer has pulled into the sand and stabilized it.
This is also where September earns its reputation. Sealer wants roughly 50 to 90 degrees, a surface that is dry to depth, and 24 to 48 rain-free hours to cure. In July you get maybe one usable window a week. By late September, high temperatures settle into the upper 80s, overnight humidity drops, and the afternoon storm clock stops running daily. Book the work while those windows exist rather than waiting for December, when everyone else calls at once.
6. Sunken edges and rocking pavers mean the base failed
Stand at the corner of the driveway where it meets the grass and look down the line. If the outer row has dropped an inch, tilted outward, or spread apart, the edge restraint is gone. That’s the plastic or concrete lip buried along the perimeter with spikes driven through it. Sandy Florida soil and heavy rain undermine it, and once the edge lets go the field pavers follow.
Same story with a dip in front of the garage or a soft spot beside the pool. Water found a path through the base, washed out the bedding sand, and now the paver sits on nothing. Sealing that does no good at all. You’re waterproofing a surface that’s actively moving.
This is a lift-and-reset job. The pavers come up, the base gets excavated and re-compacted in lifts, new bedding sand is screeded, and the pavers go back with fresh restraint and spikes. Repairs like this typically run $8 to $20 per square foot depending on depth and access, and the reason it isn’t DIY is compaction. Hand-tamping a base that will hold a vehicle doesn’t work. If you’re seeing movement rather than just discoloration, paver restoration and repair is the starting point, not sealing.
7. Pool deck problems are their own category
Travertine and pool-adjacent pavers fail differently. Chlorinated splash-out and salt systems attack the surface chemically, hollow spots in travertine open into pits, and grout or joint material around the coping cracks where the deck meets the shell. If your travertine feels slick when wet, the previous sealer had no grip additive in it, or it’s worn through.
Travertine needs a different approach from concrete pavers. It’s softer, it’s more porous, and acidic cleaners that are fine on brick pavers will etch it. Sealing a travertine deck usually means a penetrating product plus a non-slip additive broadcast into the coats, which keeps the surface safe barefoot without turning it into sandpaper. Travertine pool deck work is worth handing to someone who does it regularly.
The other pool-deck item people miss is the bond beam area. Movement right at the coping can mean water is getting behind the deck. That’s a structural conversation, not a sealing one.
What can wait and what can’t
Algae stains, faded color, and a dull finish can wait until spring if they have to. They’re cosmetic, and nothing gets structurally worse in six months.
These cannot wait:
- Empty joints on a driveway. Every storm between now and the dry season moves more sand out and lets the pavers shift. Resand before you do anything else, even if sealing waits.
- A rocking or sunken paver where cars drive. One loose paver spreads. Pull that section and reset it before the surrounding rows go.
- A slick pool deck. That’s an injury waiting to happen. Keep traffic off the wet areas until it’s addressed.
- Water pooling against the house or the pool shell. Redirect the downspout with a temporary extension today. Standing water at a foundation edge is a bigger problem than any paver issue.
In the meantime, shut off any irrigation head that’s spraying directly across the paver surface. Constant wetting feeds algae and keeps the slab too damp to seal, and a single misaimed rotor can hold a driveway hostage for weeks.
When to make the call
Do the screwdriver test and the water-bead test this week. If the joints are full, the water beads, and the only issue is a little shade algae, buy a deck brush and give it an hour on a Saturday. You don’t need anyone.
Call a professional when any one of these is true: the water soaks in instead of beading and you want protection before dry season, the joints are down more than a quarter inch across the whole surface, you see white haze that a rinse won’t remove, any paver rocks under your weight, or the pool deck is slick when wet. Those are the points where doing it yourself either won’t hold or will make the next repair more expensive.
And if you’re aiming for a sealed driveway before the holidays, the schedule fills from late September forward. Paver Rescue LLC offers free estimates at 813-391-6159, and a walkthrough takes about twenty minutes. Ask what the surface actually needs before you agree to a coat of sealer.


Leave a Reply
Want to join the discussion?Feel free to contribute!